Welcome to part 2 of our introduction to data modeling basics in Power BI (you can find part 1 here). Let’s start this post by introducing a few more common data modeling terms.
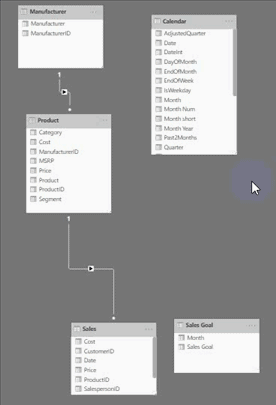
We frequently refer to business entities like product or manufacturer as dimension tables, and tables like sales as fact tables. Think of dimensions tables as qualitative or descriptive data, e.g. the product name, it’s price, it’s cost. A fact table has mostly numbers that you perform arithmetic functions on, e.g. units, total sales. In the last post, our file had two dimension tables (Manufacturer and Product) and one fact table (Sales).
When we arrange a data model to have dimension and fact tables, we often call it a dimensional data model. A dimensional data model is composed of fact and dimension tables. The fact table is tall and narrow (very few fields but many rows) and the dimension table is short and wide (many descriptive fields but very few rows).
Why do I need to know this? Why not have all my data in one table?
You certainly can, but we wouldn’t recommend it. Here are three good reasons to use a dimensional data model:
- In large datasets a dimensional data model is crucial for an efficient Power BI file; we don’t want to repeat data if we don’t have to in our fact table.
- As a Power BI report developer, this makes your job easier as well. If you need to change multiple dimension attributes, it’s easier to work on a small dimension table than a large table with millions of rows.
- Finally, as your report grows you may need to relate tables from different sources. It is difficult to add data from a different source when your data is one table. If you build your data model correctly from the start you won\’t need to fix your measures, columns, visuals later to account for new data.
Let’s look at this last point in an example.
A common dimension that is shared across multiple fact tables is a date table. If we want to add a sales goal table to our model, we need to compare our actual sales to sales goals over different time periods. Rather than use a messy date relationship between our Sales and Sales Goals table, we should utilize a date table. This way our date table contains unique date values that can be used to filter the Sales and Sales Goal table across any time frame.
We start with the same model we had the last post, but now we have added a sales goal table and a Calendar (date) table. To learn how to add a date table to a model, see this webinar post.
We want to compare these two tables month by month. Let’s start by connecting the Calendar table to the Sales and Sales Goal tables.
That was easy right? I’ve gone ahead and made two measures for our sales and sales goals. Now we will create a line and clustered column visual and add the Date column from the Calendar table to the visual axis, the Total Sales Amount measure to the column values, and the Total Sales Goal measure to the line values.
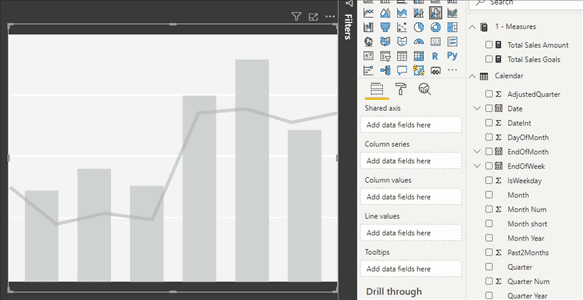
And just like that, we can compare our actual sales to sales goal for our organization in one visual, despite coming from different tables. If our sales goals were broken down by salesperson we could add salesperson as a dimension to our data model. We’ll explore that example and more in the series, Building a Report in Power BI.